Biến ảnh sprites thành ảnh động với vuejs
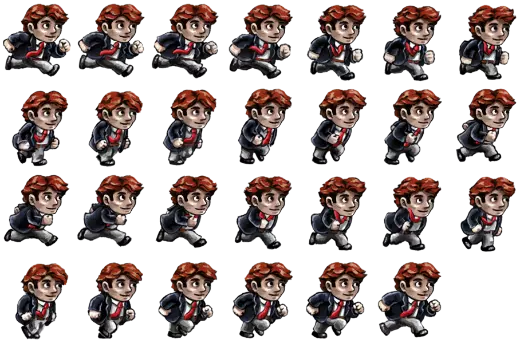
Ảnh sprites là gì? Sprites là một hình ảnh lớn được tạo ra bằng cách gộp nhiều ảnh nhỏ lại với nhau theo một cách được định trước sao cho có thể tái sử dụng lại từng ảnh nhỏ mà không bị ảnh hưởng bởi các ảnh khác.
Kiểu như thế này :
Hoặc các sticker của fb:
Mục tiêu của bài viết
Ưu điểm so với việc dùng ảnh gif
Tôi ưu hơn performance web vì thay vì load ảnh gif thì thay vào đó là anh png.
Có thể tương tác với ảnh (vd: có thể cho ảnh dừng lại hoặc tiếp tục chuyển động, hoặc chuyển động vs số lần nhất định rồi ngừng).
Tùy chỉnh chuyển động nhanh chậm của ảnh.Xây dựng component vuejs Hướng giải quyết Đơn giản chỉ là dùng js để thay đổi background-position qua từng phần của bước ảnh và lặp lại khi đến ảnh cuối vậy là mình đã có 1 ảnh tương tự gif.
Viết component Khởi tạo các props và style cho component:
1
2
3
4
5
6
7
8
9
10
11
12
13
14
15
16
17
18
19
20
21
22
23
24
25
26
27
28
29
30
31
<template> <div :style="style" > </div> </ template><script> import { clearInterval } from 'timers' ;export default { props: { image: String , height: Number , width: Number , loop: Number , frame: Number , max: Number , column: Number , row: Number , }, data(){ return { style: { width: this .width + 'px' , height: this .height + 'px' , background: `url(${this .image} )` , backgroundSize: `${this .width * this .column} px ${this .height * this .row} px` , backgroundPosition: '0px 0px' } } },
Tiếp theo chúng ta viết function để ảnh có thể chuyển động.
1
2
3
4
5
6
7
8
9
10
11
12
13
14
15
16
17
18
19
20
21
22
23
24
25
26
27
28
29
30
31
methods: { play() { let i = 0 let position = { x: 0 , y: 0 , loop: 0 , } const playTimer = setInterval(() => i++; if (i % this .column) { position.x -= this .width; } else { position.y -= this .height; position.x = 0 ; } if (i == this .max) { i = 0 position.y = 0 ; position.x = 0 ; position.loop++; if (position.loop >= this .loop) { clearInterval(playTimer) } } this .$set (this.style, 'backgroundPosition', `${position.x}px ${position.y}px`) // set lại style }, 1000/this.frame); } }
Gọi hàm play()
1
2
3
mounted() { this .play() },
Vậy là chúng ta đã viết xong component để ảnh chuyện động. full code :
1
2
3
4
5
6
7
8
9
10
11
12
13
14
15
16
17
18
19
20
21
22
23
24
25
26
27
28
29
30
31
32
33
34
35
36
37
38
39
40
41
42
43
44
45
46
47
48
49
50
51
52
53
54
55
56
57
58
59
60
61
62
63
64
65
66
67
68
<template> <div :style="style" > </div> </ template><script> export default { name: 'HelloWorld' , props: { image: String , height: Number , width: Number , loop: Number , frame: Number , max: Number , column: Number , row: Number , }, mounted() { this .play() }, data(){ return { style: { width: this .width + 'px' , height: this .height + 'px' , background: `url(${this .image} )` , backgroundSize: `${this .width * this .column} px ${this .height * this .row} px` , backgroundPosition: '0px 0px' } } }, methods: { play() { let i = 0 let position = { x: 0 , y: 0 , loop: 0 , } const playTimer = setInterval(() => i++; if (i % this .column) { position.x -= this .width; } else { position.y -= this .height; position.x = 0 ; } if (i == this .max) { i = 0 position.y = 0 ; position.x = 0 ; position.loop++; if (position.loop >= this .loop) { clearInterval(playTimer) } } this .$set (this.style, 'backgroundPosition', `${position.x}px ${position.y}px`) }, 1000/this.frame); } } } </script>
Việc tiếp theo là chúng ta gọi component này ra và sử dụng thôi.
Mình test thử với ảnh này nhé:
1
2
3
4
5
6
7
8
9
10
11
12
13
14
15
16
17
18
19
20
21
22
23
24
25
<template> <div id="app" > <ImageGif image = "https://images.viblo.asia/a28b8126-1298-4ca7-a507-53865b32238d.png" :width="100" :height="100" :column="7" :row="4" :max="27" :frame="20" :loop="10" /> </div> </ template><script> import ImageGif from './components/image-gif.vue' export default { name: 'app' , components: { ImageGif } } </script>
Thành quả :
https://codesandbox.io/s/vue-template-znn3p
Kết luận Các bạn cũng có thể tham khảo thêm github:https://github.com/tuananhp-1844/image-gif


